
Filament Extruder.. been a while..
I’ve been busy with new work and inter-regional moving and settling down and stuff, but today, I finally had time to pick up where I left things. My new workplace has a laser cutter(we are trying to establish the first Fab Lab in Korea, Fab Lab Seoul), so I don’t have to travel to anywhere. I just need to stay a little longer at work to…work.
Finally first attempt was made today, which I wouldn’t call it a success yet, but it is promising. The temperature was way too hot and the extrusion came out as liquid rather than soft plastic. Also I didn’t have enough pellets to try out more than the ones I cut out from existing PLA filament. The blender I bought is at my ex-job. Will pick it up over this weekend and try with the blended PLA. I still need to design chassis to mount a fan(barrel got a bit too hot), drill and other stuffs.
One concern is that there was no problem running it for such a short period of time but the thrust it will create onto the end of the screw/bearing might be massive, especially at a higher extrusion rate. I’ll wait and see what happens..
Anyway here I represent the ver 0.1 of the extruder. I need to give it a name as well.
이사, 이직 등등으로 인해 대략 한 달 만에 작업을 계속 할 수 있게 되었다. 사무실에 레이저 커터가 있어서 작업하기가 아주 수월해졌는데.. 어째 업무시간만 지나면 집에 가고싶은 생각이 들어서; 집에 가더라도 할 일은 없는데 말이다. 일부러라도 남아있으면서 작업을 해야겠다.
오늘 처음으로 기계를 작동시켜보았는데(이름이 필요하다) 성공이라고 하기는 뭣하지만 그래도 작동 자체는 무리없이 하는 것 같다. 일단 테스트 해 볼 펠렛이 없어서 가지고 있는 PLA를 니퍼로 잘라서 넣어봤는데 자르는게 보통 일이 아니라 손이 아파서 그만두어야 할 때까지만 하고 일단 테스트는 종료했다. 예전에 샀던 믹서기는 이전 회사에 있어서 이번 주말에 가져와 테스트를 해봐야겠다.
한 가지 명확한 것은 본체디자인을 다시 해야하겠다. 일단은 드릴이 영상에서 볼 수 있는 벽 뚫는 해머드릴밖에 없어서 그걸 사용했지만 충전식 드릴을 사용하여 작동시키는 것이 목표이기 때문에 드릴을 본체에 마운트 할 수 있도록 설계하는 것이 필요할 듯. 파이프가 좀 뜨거워져서 본체에 팬도 하나 장착하는 것이 좋을 것 같고.
한 가지 우려되는 점은, 지금처럼 짧은 시간 사용시에는 상관이 없겠지만 빠른 속도로 오랜시간 사출하는 경우(수시간 이상) 스크류 뒷쪽으로 발생하는 추력을 베어링이나 스크류 자체가 감당할 수 있을지가 궁금하네..
어쨋건 여기 0.1 버전이 작동하는 사진 및 비디오가 있음.


Filament extruder day4
It’s been kinda slow for making, due to job transision and stuff, and I am hoping for this week to briefly wrap up to run the first test. Since there is not much of similar development, I have absolutely no idea if this would work the way it was intended as. Anyways, here is the picture of the process-drilling the end cap for the screw shank.
직장때문에 요즘 작업 할 시간이 별로 없었는데, 이번주 안에 일단 대략 마무리를 지어 테스트를 해 볼 예정이다. 미니 사출기라는 정해진 스펙이 없기 때문에 작동이 될 지 전혀 예상을 못하겠는데.. 어쨋든 지난주의 잠깐이지만 작업 한 사진. 파이프 캡에 천공.

Filament extruder process day3
청계천에서 무려 삼만원의 공임을 피하고자 전 직장에 와서 밀링을 하려 했는데 CNC 상태가 별로 좋지 않았다. 뭔가 신호에 노이즈가 발생하는지 움직임이 저는 경우가 종종 있었지만, 밀링이 채 5분이 안되고 이미 저녁이라 소음때문에 민원이 들어올 것 같아 지그를 재빨리 만든 후 그냥 돌리기로 했다. 기계가 주택가에 있다보니..
두개 중에 하나 깎는 중에 노이즈가 발생해서 멈추고 나중에 수작업으로 마무리 하였다.
So.. In order to secure the heatsinks a jig was made. CNC has not been well taken care of since I left work. It was unstable and often times stuttering occurred but operation only needed to be very brief(less than 5 min) and it was becoming already late so I decided to run it anyway.
During milling one of two heatsinks, CNC started acting weird so I aborted it midway and hand finished it later.


스크류를 길이에 맞춰 자르고 끝부분을 갈아냄. 얼마 안가 드릴에 끼울 수 없는 굵기(15파이) 임을 발견하고 멘붕이왔다. 결국 작업을 접고 내일 10파이 이하 샹크의 스크류를 다시 구하러 가기로 함. 있기는 하련지 모르겠군..
베어링을 이미 15파이로 두개나 구입 -.-; 이것도 반품일세..
Screw was cut to length and ground off the sharp edge, before realizing its diameter is 15mm and cannot be secured in a drill chuck. Will get a smaller shanked screw(smaller than 10mm) tomorrow if I can find one.
Bearings were purchased today before working on the screw so they also need to be returned.


Here’s a video of milling heatsinks.
Filament extruder process day2


 All different diameters… The masonry bit bought for material propulsion turned out to be too fast for the rpm of the motor(drill), and too big for the pipe to fit inside.
원래는 다른 용도로 쓰이는 부품들을 한 곳에 모아보니 구경이 미묘하게 전부 다르다. 스크류로 사용하려돈 콘크리트 비트는 약간 두꺼워서 파이프 안에 들어가지 않기도 하고 피치도 과도하게 경사져있어서 적합하지 않다고 판단, 반품을 위해 원상태 그대로 고이 모셔놓음..
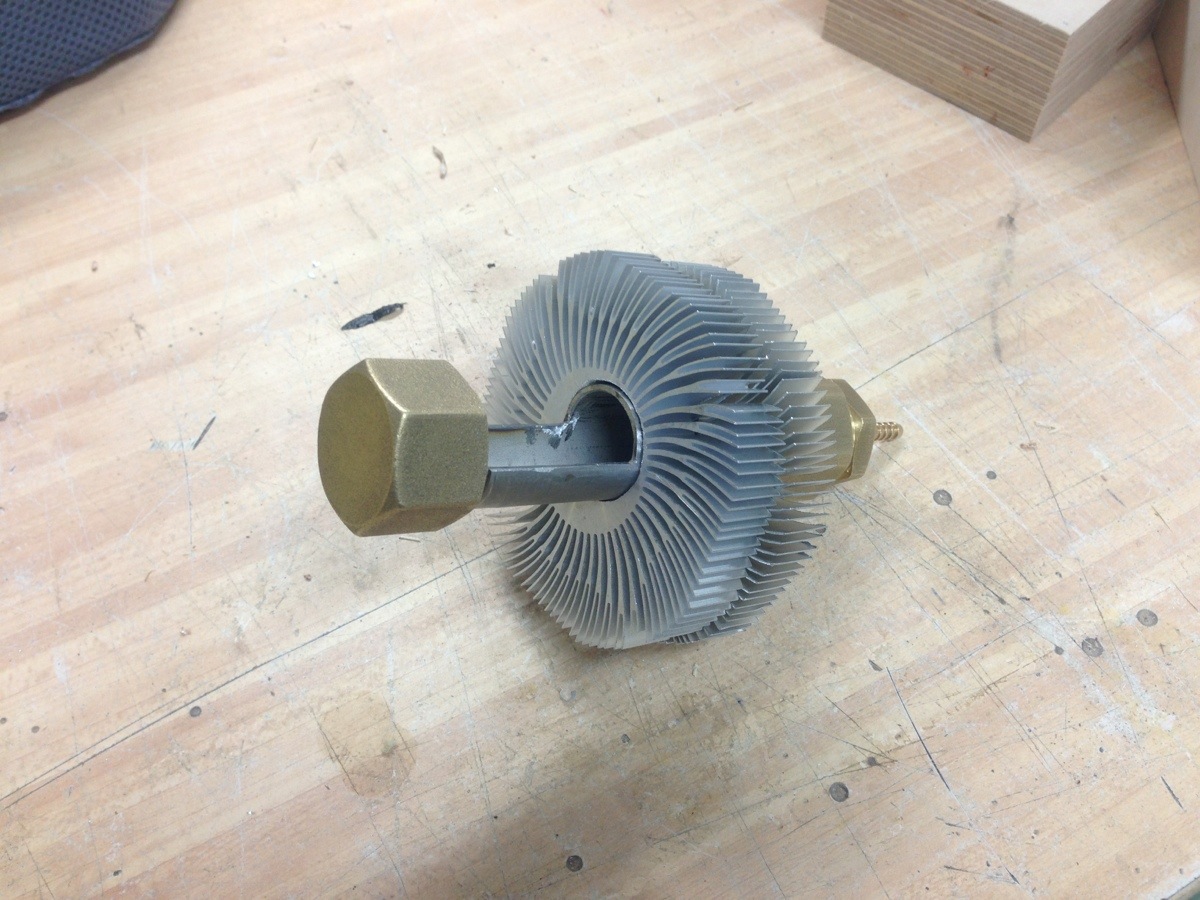
LGA775용 중고 방열판(팬 포함 각각 1500원) 은 청계천에서 26밀리 천공을 하려고 했으나 구멍 두 개 뚫는데 무려 삼만원(!!!)이나 달라고 해서 회사 cnc로 월요일에 밀링 하기로 함.
Two used heatsinks (for LGA775, $3 for two with fans) will be CNC milled for 26.5mm on Monday. I asked a machining shop for drilling 26mm hole for each and they wanted $30. CNC at work will cost $0. 
Steel pipe was marked with 3d printed half pipe marker(if this whole process is successful I will upload on Thingiverse).Then it was cut half open for hopper, angle grinder for big cuts and the rest was trimmed with Dremel.
철니플은 프린트 한 파이프 마킹 툴로 반쪽 그려놓고 그라인더로 큰 부분은 절단, 작은 부분은 드레멜로 정리. 


Outer diameter of the pipe was a bit larger than 26mm so I sanded down to very close to that size. If I had a lathe it would’ve been much easier. However this step is obsolete now because it was done before deciding to CNC the hole.
파이프 외경을 26밀리로 맞췄다. 선반이 없었기 때문에 샌딩기로 한땀한땀.. 하지만 방열판을 밀링 하기로 결정하기 전에 했던 단계라 결국 필요없는 단계가 됐다. 천공 두개가 그정도의 가격이라니…

Band heater, controller($22) and a material drive screw candidate($9) were purchased. There is quite a lot of play between the steel pipe and the auger. Sure they don’t rub against each other in industrial machines as well but this seems more than it could hold the pressure of molten plastic to not come back out of..
히터가게에서 밴드히터와 온도조절기 24000원에 구입, 스크류가게에서 만원 주고 스크류를 샀는데 틈바구니가 꽤 커서 왠지 사출부의 압력을 견디지 못하고 액체 플라스틱이 뒷쪽으로 빠져나오지 않을까 걱정이 된다. 

중고나라에서 28000원 주고 테팔 500와트 블렌더 구입 후 프린트물을 함 갈아봤는데 너~무 잘 갈려서, 망친 프린트물을 펠렛화 하는데는 전혀 문제가 없을 듯 하다. 갈아버리는 영상은 아래에..
Lastly, first PLA grinding test was successfully done. Bought a mint condition used 500W blender with ice crushing capability for $25.
Check out the blending action!
Filament extruder from reclaimed plastic
There are a handful number of filament extruders most famously Filabot and Lyman extruder, but where is all the fun if I just follow the instruction without any limitation? By making this less bulky and arsthetically less invasive, it could be used in household settings. So here’s a list of what I want my verson to fulfill.
1. Low cost(less than $100)
2. Low tech(less use of circuitry)
3. Smaller
4. Faster
So I have been making purchases for the necessary parts and as soon as it is getting built, I’ll post the process and the resulting output.
These are what I have now. Both openings weren’t flush with the inner diameter, so it was ground off for thr screw to turn freely.

플라스틱을 재활용 하는 필라멘트 사출기는 이미 몇 가지 버전이 공개되어 있는데 그 중 가장 유명한 두 가지는 Filabot 과 Lyman extruder 인데 두가지 다 집에 놓기는 너무 크고 무시무시하다. 어째 항상 할 일을 자꾸 만드는 것 같은데, 남이 이미 만들어 놓은 물건을 따라 만드는 데에 무슨 재미가 있겠나. 나도 하나 만들어 보기로 했다.
그래서 아래 목표들을 설정했다.
1. 덜 비싸게(총 제작비 10만원 미만)
2. 덜 복잡하게(복잡한 회로등 최소사용)
3. 더 작게
4. 더 빠르게
지금까지 인터넷 및 청계천을 돌아다니며 필요한 부품을 구입하고 있는데 앞으로 진행 상황이나 결과물을 올릴 예정. 뭐 망하면 망하는거고..
지금까지의 진행상황. 철파이프(니플)입구가 평평하지 않아 내경이 일정치 않음. 스크류가 잘 돌아가지 않을 것 같아 갈아냈다.


