
Ultimaker Heated Chamber

I’ve wanting to build heated chamber from last year, since I installed dual extruder and heated bed mod for printing ABS and PLA dissolvable support. Dissolvable support is crucial for outputting quality prints on par with commercial FDM machines which handle massive overhangs relatively well.

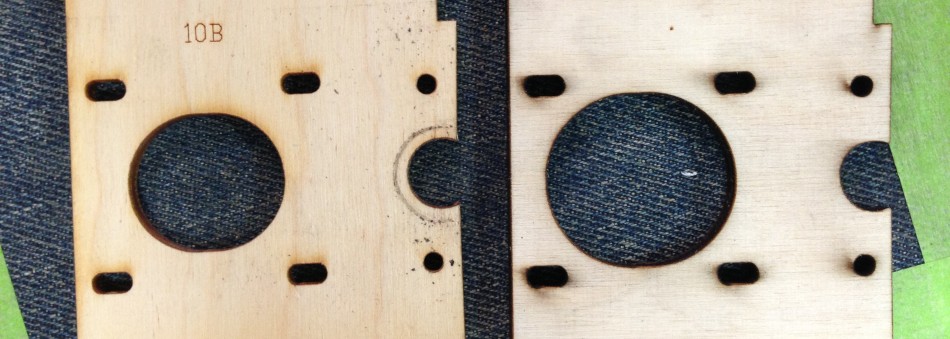
Laser cut and stacked.
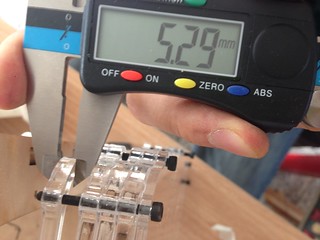
X-Y steppers are already moved to the outside and they stay cool. Stacked set-offs fit well. The only problem is acrylic sheets vary in thickness from point to point even within a single sheet. I used 5mm acrylic sheet for set offs but the thickness differ around 5% so I used washers to compensate the distance and reduce tensions caused by nearby tightened nearby bolts. I drilled several holes on the chassis to mount everything. Hinges were also printed.

Top cover has opening and lock(black part) for cables to stay in place. I used flexible PLA for flaps, which prevent heat from escaping.


With 120W power supply it heats up to 70″C in 8-9 minutes in winter. It started from fairly cold temperature(12’C) so in most cases it should be around 7. But it still takes longer than 30 minutes to reach over 90″C, it requires larger power supply but I think I will keep it this way since current power supply is pretty slim and fits nicely underside, makes it invisible.


All drawings are posted here
Size doesn’t matter..
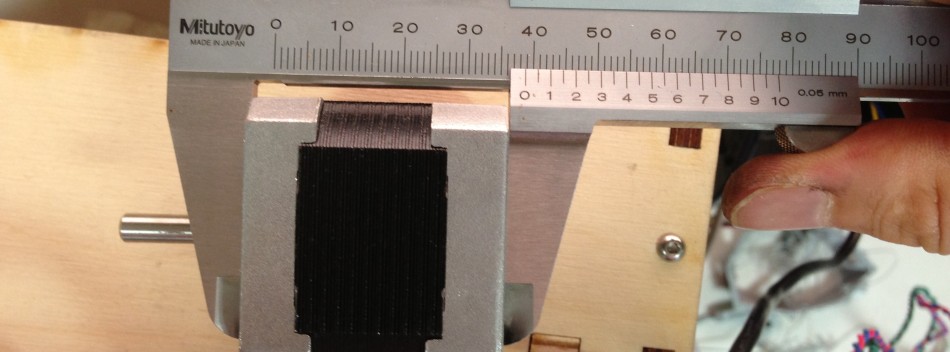
original stepper from Ultimaker
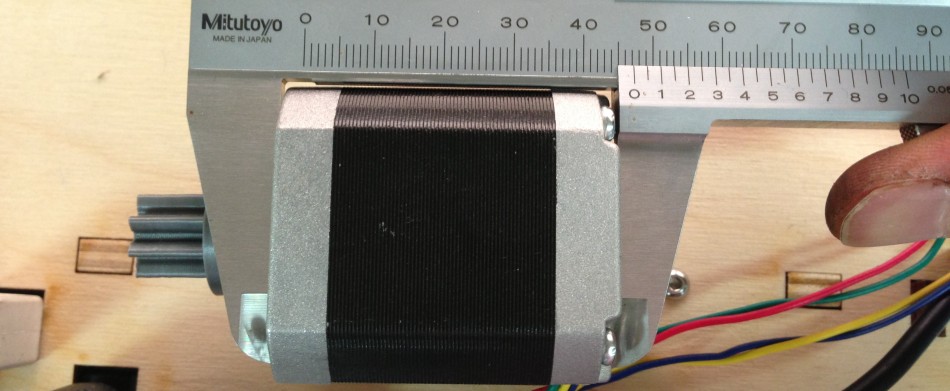
new, longer(but weaker) stepper
Been trying to find the perfect balance(even swapping parts, hoping for better a result) in retraction. I’ve almost successfully eliminated ooze and strings, but blobs at Z axis movement or before crossing perimeter, thus a small pause occurs when retracting and re-engaging filament still exist. Z blob needs to be solved in different ways, such as slicing software or firmware or so..
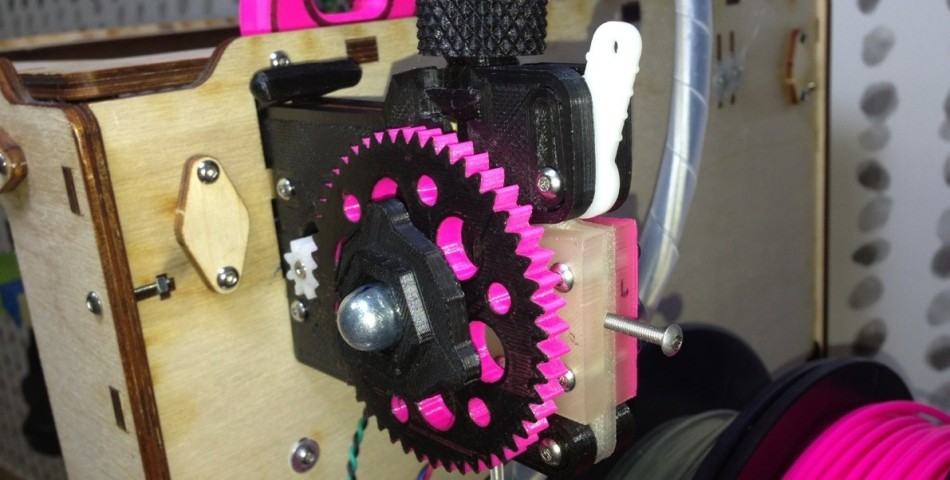
There was a larger stepper(same NEMA17 but longer-from Printrbot) lying around in the lab so last weekend I made a few new parts to fit on the extruder. Replaced motor only could handle 30mm/s retraction, over that it always lost steps. I played with pot on the stepper driver with no luck. Larger motor gave me this feel of it might hold stronger torque, which turned out not true. Need to look into stepper specification, after all size really doesn’t matter.
After going back to the original stepper, I again, adjusted the pot on the extruder driver, and made it inoperable. Luckily I found a distributor in Korea selling pololu board. If you ever happened to be in Korea and desperately need one, here is where to go.

fresh cut plates
new, larger hole
항상 그랬듯이 리트랙션이 문제.. 프린트되지 않아야 될 부분에 있어서는 굉장히 깨끗하게 나오는 것이 가능해졌었다. 이제 남은 부분은 Z축 움직일때와 perimeter 건너 뛸 때 생기는 blob인데 후자의 경우는 필라멘트가 리트랙션되거나 리트랙션 되었다가 다시 프린트를 하기 위해 노즐로 밀어넣는 상황에서 노즐이 멈춰있기 때문에 일어나는 현상이다. 따라서 리트랙션에 걸리는 시간을 최소한으로 단축해 줄 경우에 노즐이 멈춰있는 시간이 줄기 때문에 흘러나오는 플라스틱의 양도 줄어들고, blob도 줄일 수 있다.
지난주말에 그렇게 해 보려던 차에 Printrbot 분해할 때 나와 랩에 굴러다니는 같은 NEMA17 사이즈지만 좀 길쭉한 스테퍼가 있길래 왠지 홀딩토크가 잘 나올 것 같아 교체를 해보았다. 교체를 위해 기어도 프린트 하고 기어를 고정하는 볼트땜시 익스트루더 마운트 플레이트도 새로 교체를 해야 했는데.. 어쨌건 결과적으로는 사이즈가 크다고 무조건 토크나 스피드가 더 나오는 것은 아니라는 것. 믿을 수 없을 정도로 리트랙션이 30mm/s를 넘어가면 바로바로 스텝이 빠졌고 다시 교체하는 과정에서 스테퍼 드라이버보드를 또 태워먹었음.
한국에서 폴롤루 스테퍼드라이버를 파는 곳이 있어서 다행히도 외국에서 주문하지 않아도 됐다.. 가격도 뭐 대략 적당한 편.

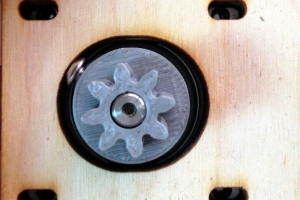
- printed gear
stuck bolt
Micro Octocopter


Made with v939 micro quad board with eight u816 motor, arm, blades.
Lightweight frame is 3d printed on Ultimaker with PLA, and it breaks every few crashes. It needs to be more structurally sound and maybe I’ll print it wht IMPLA (impact resistant PLA. feels sorta similar to ABS) I bought from Diamond Age Solutions.
I don’t know if it is natural but even at 40% rate at the controller, it is so sensitive at the point I can’t fly well for more than a minute. U816 quad is able to balance well, not as much as minipet quad, but this octacopter, if I set the controller for 100%, it flips with just regular movements. Maybe there is a way to dull it down somehow..
Next step:reedcopter
v939 마이크로 쿼드콥터 보드에 u816 모터, 암, 블레이드를 이용해 제작.
경량 프레임은 울티메이커를 사용해 프린트했는데 아무래도 PLA다보니 몇 번 추락할 때 마다 부러져서 일단은 인두로 플라스틱 웰딩을 해서 붙여놨는데, 프레임을 더 구조적으로 견고하게 만드는 일이 필요할 것 같다. 일단 이번 주말동안 뉴질랜드에서 지난번에 구입한 충격에도 잘 깨지지 않는 재질(IMPLA, abs와 비슷한 느낌이던데)로 프린트 해봐야겠다.
그나저나 조종이 너무 과도하게 민감해서 충격보호용 뭔가를 씌워야 할 것 같긴 한데, 콘트롤러를 40%만 세팅해놔도 너무 민감하게 움직여서 조종하기가 힘들다. 다른 마이크로 쿼드의 경우에는 이정도는 아니던데 v939의 특징인지 뭔지는 잘 모르겠다. 100%로 세팅하면 앞으로 가려고 하면 그냥 홱 뒤집어짐.. 반응을 둔감하게 하는 방법이 뭐가 있는지 구글링 해봐야겠음.
다음차례는 억새콥터..
watch it fly
Rainbow pack PLA
Just in 8 days, I have received roughly 10kgs(1100meters) of various 3mm filaments with high impact PLA which I can’t wait to test how robust the parts made of it is.
This is my first time ordering from Diamond Age Solutions in New Zealand, and I’ll post the review of the filaments. I heard good things about them tho.
불과 8일만에 뉴질랜드에서 10kg(길이가 1km이상!)에 가까운 재료가 도착했다. 11종류인데 그 중 하나는 충격에 강한 재료라고 하는데 프린트 해서 테스트를 꼭 해 보고 싶다.
좋은 리뷰를 보고 Diamond age solutions라는 뉴질랜드 회사에서 주문을 했는데 필라멘트 품질은 나중에 테스트 후에 올리고.. 일단 뉴질랜드 사장님(?) 이 매우 친절함.

Extruder feeder upgrade
최근에 사출기 스테퍼모터가 드거걱? 하는 소리를 내면서 리트랙션이 잘 안 되는 경우가 종종 있었다. 스텝이 빠져서 재빨리 리트랙션이 되어야 할 때 모터가 잠시 멈춤으로 인해 계속 사출이 되고 그게 프린트에 붙어 지저분해지게 된다. 뭐 내가 엔지니어가 아니다보니 항상 이런 문제에 있어 전기전자는 일단 거의 배제하고 시작하는데 그렇기 때문에 이거닷 이라고 하는 100%라는 확신은 없지만 서도 내 생각에는,
아마도 이렇게 된 이유가 뭐냐하면 필라멘트를 닫아서 누르는 부분이 Delrin 이라는 재질인데 이게 마찰력이 아주 낮기 때문에 여기 적용이 됐지만 적절한 사출을 위해서 사출기 노브를 돌려 압력을 높여서 필라멘트를 충분히 누르려고 하다보니 마찰은 결과적으로 과도하게 증가하고 심지어 Delrin 파트에 필라멘트 자국마저 남겼다.
이걸 (아래 두번째 사진) 프린트 했는데, 한동안 사용해보고 나중에 결과를 포스팅 해야지.
이게 원래 설계도에서 따서 만든거라는데 어째 닫는 손잡이가 제대로 닫히지를 않아서 그냥 열어놓아야 한다. 아까전에 원래 사용하는 것 처럼 닫아놓고 열리지 않도록 묶어놨다가 중간 파트가 쪼개지는 바람에 부품교체를 하고 손잡이를 열어놓는다. 작동은 잘 되는 듯?
Recently the stepper motor at the extruder side started chattering. I can hear it is not working right. When feeding filament it works very very well even on higher speed, no grinding filament at all, but the problem shows when quickly retracting.
The motor misses steps, making rather loud chatter and pausing for a brief moment, failing to print neatly. The reason for this might be the increased friction between the filament and the white Delrin part in the feeder door. Although the material was selected for low friction, the need to grip tight for proper extrusion usually leads to overpressure. PLA even made indentation on Delrin.

So, the solution might be this upgrade, and I will post the result after good amount of use.
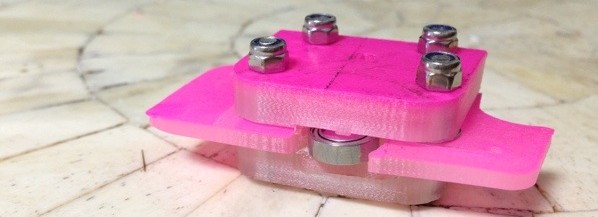
Locking handle does not close. The center part cracked after holding the handle closed, so the part was replaced and the handle stays open. Seems like it doesn’t matter much.
Modifying firmware settings..
That “infill not touching perimeter” print, which it works fine now, in 120mm/s speed with 8000mm/s^ acceleration.
Stamp Printing
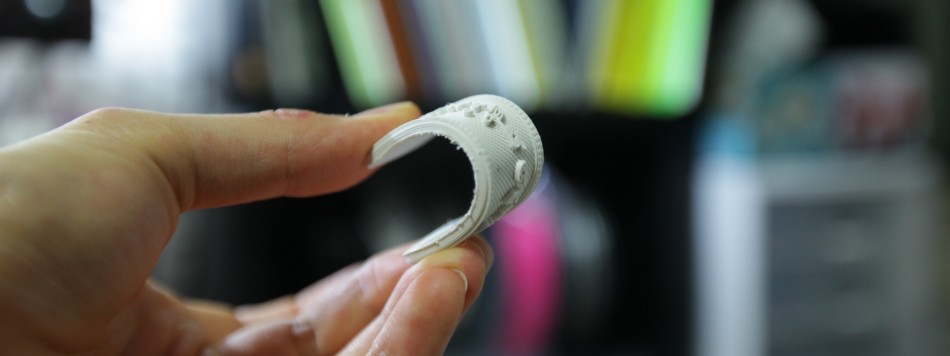
2nd trial for printing with flexible PLA. (first was a calibration print)
I did not have anything to ink with so applying generous amount of sharpie, which still dried before stamping, came out a little washed. Lower case letters are about 1/4″ each with 0.3mm wall, but some parts didn’t fill due to 0.4mm nozzle size, which is still little too large to print. Maybe thinner wall (<0.2) will help.

There still are many improvements to be made from slicing to extrusion. Most importantly, aside from software issues, melting plastic filament for extrusion is totally analogic and therefore lots of space for errors. I’m not sure if there’s a such thing on the commercial grade additive 3d printers but flow control depends entirely on the viscosity of the molten material at the moment of extrusion. Most problems from imperfection of software/hardware are easy to locate and solve and certainly will be solved in a near future It would improve from various approach from software to hardware, but for now these printers are still far from commercial grade even for the finely tuned ones.
일전에 테스트 프린트 이후 고무같은 재질의 플라스틱으로는 두 번째 프린트. 도장을 프린트 해봤는데 작은 소문자의 크기는 5~6mm정도, wall은 0.3mm로 프린트 하였는데 그럼에도 불구하고 ‘f ‘ 의 경우 아랫부분이 infill이 없이 프린트 되었다. 0.2mm 로 세팅을 하면 되지 않을까 싶기도 한데 노즐이 0.4 mm다보니 아마 0.2mm가 마지노선이 아닐까 싶다.
스탬프나 인주가 없어 네임펜으로 마구 칠한 후 도장을 찍었더니 찍기 전에 마른 부분은 좀 빈티지하게 나오는 효과가..

프린터를 대략 10개월정도 사용해 본 소감으로는 아직 발전할 부분이 많지만 재미있게 프린트 하는데는 충분한 정도라는 것. 소프트웨어나 하드웨어에서 천천히 동시다발적으로 발전이 이루어지고 있지만 여러가지, 예를 들면 녹은 플라스틱의 흐름제어는 전적으로 핫엔드에서 사출 된 상태의 점도에 의존하는 점(100%아날로그), 그렇기 때문에 오류가 날 소지가 많아 프린트가 완벽하지 않게 나오는 경우가 있다. 그렇긴 해도 아직 소프트웨어나 하드웨어가 완벽하지 않기 때문에 발생하는 문제들은 원인이 명확하고 따라서 해결방법도 명확한 경우가 많다. 현재로서는 상용제품들과는 퀄리티에 있어서는 아직 갈 길이 멀어 보이지만 이러한 문제들은 가까운 시일 내에 해결이 될 것으로 본다.

Reinforcing bowden tube


New bowden tube has thinner wall and it couldn’t withstand the strength required. It started to bend where there is lots of compression occurs (inside the carriage, approx 60mm~70mm/2.5″~3″) and again, there was some increased friction where the tube is bent, so I decided to reinforce it with something of thin but stiff tube. I was originally planning on purchasing metal tube which will provide more than enough stiffness, but found a BIC pen lying around fitting almost perfectly, so I cut it and fit it.
With this I hope it can print high(er) speed printing such as over 150mm/s with decent quality.
새로 구입한 정수기 튜브가 내경이 넓고 외경이 얇다보니 빳빳함이 예전 튜브보다 덜 하여 프린트 헤드 캐리지 안에서 프린트 헤드에서 필라멘트를 압출하면서 생기는 반발력으로 인해 캐리지 윗쪽에서 단단히 튜브가 고정된 아래쪽(그러니가 캐리지 안쪽 60-70mm정도)에서 튜브가 휘는 현상이 발생하여 마찰력이 높아지는 상황이 되었다. 그래서 튜브의 휨을 방지하기 위해서 바깥쪽에 금속재질의 파이프를 덧대줄까 했는데 내가 가지고 있던 BIG볼펜(똥 엄청 나오는 미제)을 발견하고 사이즈가 딱 맞길래 잘라서 설치해 보았다.
일단 전체적인 마찰력은 훨씬 줄어든 것 같고, 앞으로 현재의 1.5배 이상의 속도로 꽤 괜찮은 퀄리티가 나오기를 기대해보는데..
Jeju Volcanic Island (UNESCO World Heritage Site)


Unesco World Heritage Site Jeju Island in 1:400,000 scale. It’s, I guess, pretty damn accurate for how the data was acquired and manipulated for print. Note it is vertically exaggerated 4X approximately, therefore vertical scale is close to 1:100,000. See how it’s done here.
Each layer (0.1mm) represents 10 meter(33 feet) in life. Satellite photo credit goes to Wikipedia entry on Jeju Island.
Download the digital model from here
1:400,000 축척 제주도. 한라산 높이가 잘 표현되지 않아 4배정도 높였다. 0.1mm 레이어로 프린트 했는데 높이 축척은 1:100,000 정도 되므로 실제로는 0.1당 약 10미터. 실제로 200레이어였음. (195레이어 + 0.5mm 밑면두께)
어떻게 하였는지는 여기서(영문). 그리고 3D 모델은 Thingiverse에 업로드 하였음!
BACKDROP

Overnight Printing

Although it isn’t a subtractive machining it still generates quite busy robotic noise which makes me feel like I need to wake up and get to work. I can hear all that robot talk lying only 10″ away from the machine in this studio apartment. Last night I had to interrupt the process for my good night sleep.. The Print
CNC같이 재료를 깎는 방식이 아니라 재료 가공에 있어는 조용하지만 밤에 하는 프린트는 여전히 바쁜 로봇같은 소리를 많이 낸다. 특히 왠지 몹시 바쁜 로봇같은 소리는 자다가도 일어나서 급하게 일을 해야 할 것 같이 나를 좌불안석으로 만든다. 혼자사는 작은 공간에서는 특히나 전부 들릴 수 밖에 없다. 예민한 나는 어제는 도저히 잠이 안와서 중간에 일어나서 껐다. 프린트 모델
Piece of France


This is by far the hardest print ever done on my UM(Ultimaker), and it turned out, I think, fine. I guess it’s a relatively new thing on Thingiverse, and a few people have claimed they have printed it.
I had to leave home for a break so not really sure how long it took for the bottom part, but I’m guessing overall print time should have been about 25 to 30 hrs. Pinnacle part had to be printed separately(and slowly) due to its intricacy.
초고난이도 에펠탑을 이번 휴가를 틈타 프린트. 집을 한동안 떠나 있어야 해서 돌려놓고 나갔는데(급하게 나가느라 에어콘도 켜놓고-_-) 전체 프린트 시간이 대략 25에서 30시간정도 된 듯 하다. 첨탑부분은 모델의 섬세함 때문에 아주 천천히 프린트 해야 했다.

Extruder Plate
 I’ve started to print replacements (for various parts in plan) in case if anything breaks unexpectedly. Shit happens.
어머니는 말씀하셨지. 미리미리 준비하라고. 그런 의미로 대체부품들을 만들기 시작했다. 언제 뭐가 고장날 지 모르기 때문에..
Bowden tube/hobbed bolt problems
Had a very frustrating day due to a couple of troubles. Bowden tube popped out a few times at the extruder end during printing, and eventually it had to be cut for about 1.5cm, which solved the problem. But I wasn’t able to fix hobbed bolt grinding filament problem. I was printing with 0.25mm layer height with 60mm/s feed but at certain point, for sure, filament stops extruding. Messed up 10+ prints with different settings. Slower extrusion(either in feedrate or layer height) seems like the only answer, or is it?
Bowden tube가 extruder 쪽에서 자꾸 빠지는 현상이 발생해서 여러가지 시도 끝에 결국 1.5cm정도를 잘랐다. 그 외에 오늘 0.25높이로 출력하던 10개 이상의 프린트를 망쳤는데(초반에 망쳐서 그나마 다행) 필라멘트가 사출되지 않고 자꾸 갈리는 현상이 발생했기 때문이다. 예전부터 이 문제는 해결이 안 된 상태였는데 여러가지 시도를 하다 결국 포기하고 사출 속도를 늦춰(속도를 줄이던가 아니면 적층을 낮추던가) 인내력을 키우는 방법으로 돌아갔다. 다른 방법은 없는건가?
EyeCan/EyeWriter casing


얼마전에 삼성전자에서 창의개발연구팀의 1호 과제로 화제가 됐던 아이캔의 하드웨어를 개조하고 기판 마운팅/케이싱을 제작해 보았다. 전체적인 크기 및 무게가 대략 60-70%정도 줄었다. 사지마비 환자들에게 테스트 해 보고 사용성 평가를 조만간 나갈 계획. 2009년 미국서 처음 개발/공개된 버전 (아이라이터) 보다 많이 발전을 이루었지만 아직 기술적/가격면의 여러 개선점이 남아 있다. 어쨌거나 간단하게 어느정도 수량의 케이싱은 제작이 가능하지 않을까 싶다. 부속품 수급이 되면 체결을 나사종류로 하면 좋을텐데, 현재는 케이스 위아래만 순간접착제로 살짝 붙여놨다.
Improved version on The EyeWriter project. Have been testing variations on a several quadriplegic patients, mostly ALS. This is the latest development tho it hasn’t been tested out in the field, I was able to shrink down the overall weight and size by roughly 60-70% which I think will greatly reduce vibration at the camera end. Will test out soon probably in the next week.
3D Printed Rock Solid IPhone 4 Bumper


Over the week I have been perfecting the super tight bumper for my iphone. After more than 40 fails I finally found the right formula. It’s so tight you have to (sorta) pound the iphone to fit in.
투톤 아이폰 범퍼. 일주일간 40번 이상의 수정을 거쳐 드디어 완성작이 탄생했다. 초 타이트 하므로 플라스틱 특유의 뻐벅댐이나 와글거림이 없음. 그래서 끼우기도 힘듦;
Troubleshooting/Upgrade


 아침에 일어나자마자 시작한 개조를 아쉽게도 파워 스위치 불량으로 끝내지 못했다. 지금까지 3가지의 고치고싶은 문제가 있었는데 이번 개조가 그 문제들을 잘 해결 할 수 있지 않을까 싶다.
1. 파워 버튼을 가끔 발이나 로봇청소기나 뭔가가 치는 바람에 프린트 중간에 꺼지는 경우가 가끔 있음.
2. 조명이 없어 사진을 찍을 때 어려움.
3. USB 파워만 연결 해도 system fan이 낮은 rpm으로 돌아가는 현상.
하단 오른쪽의 흰 스위치는 조명 온오프 용으로 산건데, 파워스위치(옆에 구멍이 그 자리)가 불량이라 일단 조명과 파워를 한꺼번에 연결했다. 파워스위치가 불량인 줄을 모르고 한시간동안 머리 싸매고 뭐가 문제인지 고민했음. Fan 돌아가는 문제는 포럼에도 있는데, 차후 Ultipanel 장착을 하기 위해서 만들어 놓은 점퍼 때문이라고 하는군. 단지 점퍼만 제거하니 fan 문제는 해결 되었다. 전선을 아답터 연결부에서 따 와서 7812를 사용, 스위치 안의 LED로 바로 연결, 시스템을 켜지 않아도 스위치 불은 들어온다. LED소모전류량이 1A가 넘는 것 같은데, 잘 버틸 지 모르겠네. 문제가 생기면 그 때 다시 포스팅.
Last night I had a hard time getting sleep so with my sleepy eyes I started some mods until I was finally bummed by finding out one of the switches was defective. I spent a good hour to figure out what I was doing wrong with frustration. Anyways, here’s a list of what I’ve wanted to do and done.
1. Power rocker switch has been hit(by feet or Roomba and so) for some times causing the printer to shut off during printing.
2. Printing chamber is too dark to take pix. Had to raise ISO for >6400.
3. System blower runs at slow speed when USB only is connected. Then it runs at full speed when power on.
So,, I wanted to install 2 switches for power and light, and as in the picture everything is connected to one button. Yes, the hole was for the (defective) power switch. I drew power from adapter connector socket (19V/always on) to 7812 then ran it thru LED within the switch, so it is always glowing even when the whole system is down.
For the system fan, all I needed to do was just removing a jumper right next to it. The jumper is for future upgrade.
Perfect Circle! …almost.

The difference is clear.. Before (left) and after (right).
같은 파일. 비포(왼쪽) 애프터(오른쪽).
Fun with a gun
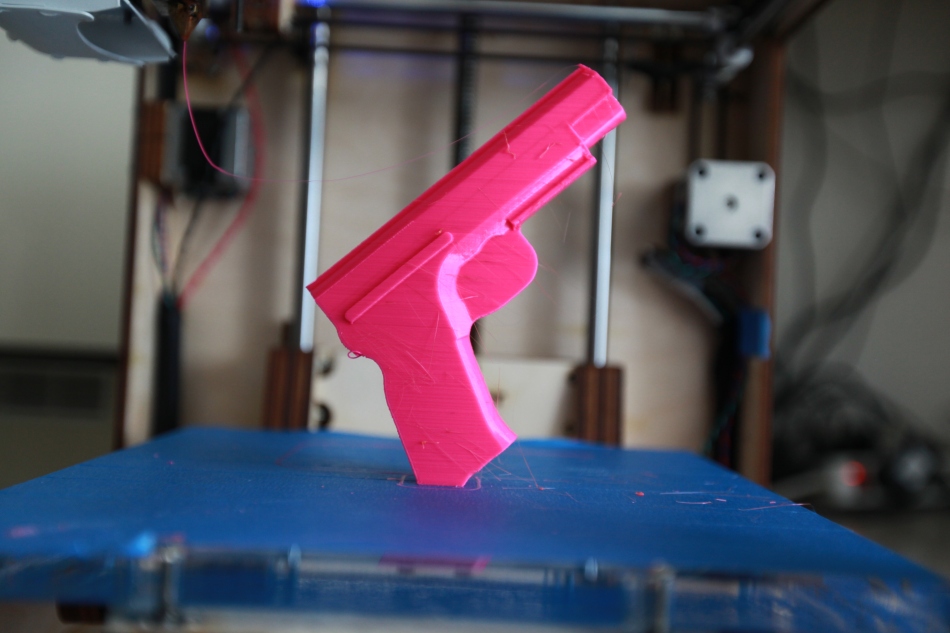
밤새 프린트. 소요시간이 대략 8시간정도 되는데, outer wall이 두꺼운 이유도 있지만(concentric / 4 perimeters / 4 solid layers) 프린트 스피드를 30으로 세팅해 놓았기 때문. Infill을 없애고 껍데기만 두껍게 하는 방법은 오늘 처음인데, 나름 퀄리티가 괜찮은 것 같다. 스피드를 올려서 테스트를 해봐야겠지만 총신 아랫부분의 overhang(대략 45도?)도 잘 나왔다.
Sliced with Slic3r / Printed with Printrun / Printed on Ultimaker / 0.2mm layer height
Hello World!

처음으로 칙칙한 검은색을 벗어나 산뜻한 핫핑크로 프린트를 했다.
접착이 불량했는지 떼는 도중 컵이 쪼개지는 불상사가…
Sliced with Cura / Printed with Printrun / Printed on Ultimaker / 0.05mm layer height
